
I have to admit that I been extremely lucky in some aspects of my life. For example, I have pretty awesome parents. When I came back to Bulgaria after studying abroad for four years, their extremely generous gift to me was a place of my own. Of course, that meant that I got the opportunity to go wild with the design and decoration, something that every artistically inclined person dreams about.
In reality, I can’t say that I really went wild: I didn’t use ten different colors for my walls, I didn’t choose eccentric furniture that nobody would ever sit on, and I didn’t put a fake leopard rug in the living room (thank heavens!). What I tried to do was to color coordinate and to work towards a clean and modern look, while adding creative touches here and there in order to keep the artistic feel of the place.
My pride and joy in that respect is the bedroom.
THE BEDROOM
My bedroom is on the top floor of the house, with one wall almost entirely taken up by glass doors leading to a terrace, which overlooks the city. There is another window on the southern wall, which has the most gorgeous view of the Vitosha Mountain. All in all, it’s an awesome space. I also wanted this to be the space that felt the most like me. Those of you who know me well would know what this means; for those of you who don’t, I’ll tell you one word: blue. Not only do I love the color blue, but every room that I have occupied in the last ten years or so has been decorated in blue. This time, I chose a light shade that went nicely with the scheme of lighter and darker shades of beige with chocolate brown accents that I had chosen for the rest of the apartment.
The Design
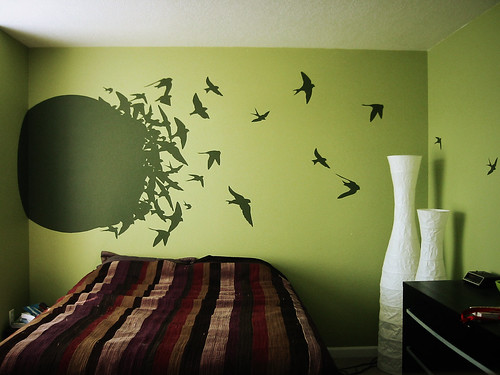
There is one peculiarity of the wall behind my bed. Due to the structure of the house, that wall is actually divided into two parts, with one part standing out more than the other. Most people would view that as a flaw, but I think that such “flaws” provide great opportunity to create something really unique. That’s when I came up with the idea of painting half of the wall light blue and having a light blue flock of birds coming out of it and flying into the light beige half of the wall. In the past year or so, birds have become something of a recurring theme in my art and photography. The image of a bird in flight conveys an amazing sense of freedom and movement, so the design seemed like a good choice for my bedroom.
Surfing around the internet for ideas, I looked at companies that produced wall decals. Even though I found some nice wall decals and stickers, they were ridiculously expensive and not in the color that I wanted. Then, I decided to browse through flickr, and I stumbled upon this photo of an awesome wall mural by Austin '81
The idea was very close to what I wanted, and I was very happy to read in the description of the photo that the people executed the whole thing all by themselves using stencils and having a lot of patience. I used some of the bird shapes from the photo for my design, adding others that I had drawn myself.
The Way to Do It
I was familiar with the idea of stenciling, but as I had never done it, I had to do a bit of reading on the technique. From my experience, however, only about half of the information and tips that you can read online on the subject are actually useful.
For example, most do-it-yourself websites suggested that I use cardboard stencils or stencils made out of thick transparent plastic sheet. In turn, I discovered that it was better to make them out of self-adhesive foil for several reasons:
1. You can find really cheap self-adhesive foil. Since it doesn’t matter what the color or the pattern of the foil is, you can buy whatever is on sale. In Bulgaria, you can find self-adhesive foil in most stores that have home improvement and construction products, and it is quite cheap.
2. Cutting stencils out of the soft thin foil is a lot easier than cutting cardboard or plastic sheets.
3. Self-adhesive foil stickers are very easy to stick to the wall, just like their name implies. Also, you won’t have to worry about the stencil moving and ruining your design in case you have to apply paint several times.
The self-adhesive foil idea was actually my dad’s, so a big shout out goes to him for suggesting it.
What You Need
What I ended up using for my project was the following:
- light blue and light beige paint
- self-adhesive foil
- craft knife
- small paint roller and small art brush
- lots of enthusiasm
Getting It Done
Armed with all the necessary materials, inspiration and patience, I followed the steps below:
1. I mapped out my design, taking into account the measurements of the wall. Based on that, I calculated the approximate dimensions of the different bird silhouettes and drew them on the self-adhesive foil.
2. I cut out the bird shapes using my craft knife. An important thing to remember is to cut on a cutting mat or other protective surface, so that you don’t destroy your furniture.
You should use the "negative" part of the self-adhesive foil cutouts for your stencil, which leaves you with the "positive" cutouts of the birds (see images below for the "positive" bird cutouts). If you like the color of the foil that you have chosen, you can play around and decorate something else with these birds.


3. I placed the foil stencils to the wall as per my design. I made sure that the edges of the bird shapes had adhered well to the wall, so that there would be minimum leaks of paint once I start painting.
4. I used the paint roller to apply an even coat of paint and achieve a clean “silhouette” kind of look. It is best to apply the paint from the outside to the inside, so that the edges of the shapes stay clean and sharp.
5. I applied several more coats of paint until I was satisfied with the result.
6. I took the stencils down carefully, pulling diagonally. It is important to take the stencils down sooner rather than later, so that they don’t get really stuck to your wall (even though the danger of that happening is actually not very big).
7. I left the wall to dry for a day.
8. Since some bird shapes had to overlap in order to create the “flock” design, I had to repeat steps 3-6 over a couple of days until my design was done.
This is what my wall looked like at this point in the process. Some of the birds were stenciled already, but not all:

9. Finally, I used the small art brush to fix any leaks of paint or other minor flaws of the painted image.
You can see the finished wall below. I dare say it turned out great:)

To finalize the décor of my bedroom, I bought light blue curtains and light blue bed covers. I also have these lovely sheets with a cloud pattern that go really well with the overall sky/birds theme. My mom suggested painting one of my laundry baskets in blue, which also turned out great. You can see some of these additional decor touches in the images below:


OTHER IDEAS:
Other things that you can do:
- Paint a wall in a darker color, like dark blue, dark green, etc, and have a design in lighter color on top of it. If you match that with light furniture or a light rug on the floor, you’ll have one classy room.
- Stencil your ceiling. Imagine how cool it will be if you stencil the flock of birds on the ceiling and look at them first thing in the morning.
- If you want something funky for your children’s room, you can have them do handprints in different colors.
- If you have the money and you are not too picky about the color, you can get wall stencils. I have found some pretty awesome ones available online at the following addresses:
www.thesurfacestore.com
www.applepiedesign.be
www.miraentuinterior.com
In reality, I can’t say that I really went wild: I didn’t use ten different colors for my walls, I didn’t choose eccentric furniture that nobody would ever sit on, and I didn’t put a fake leopard rug in the living room (thank heavens!). What I tried to do was to color coordinate and to work towards a clean and modern look, while adding creative touches here and there in order to keep the artistic feel of the place.
My pride and joy in that respect is the bedroom.
THE BEDROOM
My bedroom is on the top floor of the house, with one wall almost entirely taken up by glass doors leading to a terrace, which overlooks the city. There is another window on the southern wall, which has the most gorgeous view of the Vitosha Mountain. All in all, it’s an awesome space. I also wanted this to be the space that felt the most like me. Those of you who know me well would know what this means; for those of you who don’t, I’ll tell you one word: blue. Not only do I love the color blue, but every room that I have occupied in the last ten years or so has been decorated in blue. This time, I chose a light shade that went nicely with the scheme of lighter and darker shades of beige with chocolate brown accents that I had chosen for the rest of the apartment.
The Design
There is one peculiarity of the wall behind my bed. Due to the structure of the house, that wall is actually divided into two parts, with one part standing out more than the other. Most people would view that as a flaw, but I think that such “flaws” provide great opportunity to create something really unique. That’s when I came up with the idea of painting half of the wall light blue and having a light blue flock of birds coming out of it and flying into the light beige half of the wall. In the past year or so, birds have become something of a recurring theme in my art and photography. The image of a bird in flight conveys an amazing sense of freedom and movement, so the design seemed like a good choice for my bedroom.
Surfing around the internet for ideas, I looked at companies that produced wall decals. Even though I found some nice wall decals and stickers, they were ridiculously expensive and not in the color that I wanted. Then, I decided to browse through flickr, and I stumbled upon this photo of an awesome wall mural by Austin '81
The idea was very close to what I wanted, and I was very happy to read in the description of the photo that the people executed the whole thing all by themselves using stencils and having a lot of patience. I used some of the bird shapes from the photo for my design, adding others that I had drawn myself.
The Way to Do It
I was familiar with the idea of stenciling, but as I had never done it, I had to do a bit of reading on the technique. From my experience, however, only about half of the information and tips that you can read online on the subject are actually useful.
For example, most do-it-yourself websites suggested that I use cardboard stencils or stencils made out of thick transparent plastic sheet. In turn, I discovered that it was better to make them out of self-adhesive foil for several reasons:
1. You can find really cheap self-adhesive foil. Since it doesn’t matter what the color or the pattern of the foil is, you can buy whatever is on sale. In Bulgaria, you can find self-adhesive foil in most stores that have home improvement and construction products, and it is quite cheap.
2. Cutting stencils out of the soft thin foil is a lot easier than cutting cardboard or plastic sheets.
3. Self-adhesive foil stickers are very easy to stick to the wall, just like their name implies. Also, you won’t have to worry about the stencil moving and ruining your design in case you have to apply paint several times.
The self-adhesive foil idea was actually my dad’s, so a big shout out goes to him for suggesting it.
What You Need
What I ended up using for my project was the following:
- light blue and light beige paint
- self-adhesive foil
- craft knife
- small paint roller and small art brush
- lots of enthusiasm
Getting It Done
Armed with all the necessary materials, inspiration and patience, I followed the steps below:
1. I mapped out my design, taking into account the measurements of the wall. Based on that, I calculated the approximate dimensions of the different bird silhouettes and drew them on the self-adhesive foil.
2. I cut out the bird shapes using my craft knife. An important thing to remember is to cut on a cutting mat or other protective surface, so that you don’t destroy your furniture.
You should use the "negative" part of the self-adhesive foil cutouts for your stencil, which leaves you with the "positive" cutouts of the birds (see images below for the "positive" bird cutouts). If you like the color of the foil that you have chosen, you can play around and decorate something else with these birds.


3. I placed the foil stencils to the wall as per my design. I made sure that the edges of the bird shapes had adhered well to the wall, so that there would be minimum leaks of paint once I start painting.
4. I used the paint roller to apply an even coat of paint and achieve a clean “silhouette” kind of look. It is best to apply the paint from the outside to the inside, so that the edges of the shapes stay clean and sharp.
5. I applied several more coats of paint until I was satisfied with the result.
6. I took the stencils down carefully, pulling diagonally. It is important to take the stencils down sooner rather than later, so that they don’t get really stuck to your wall (even though the danger of that happening is actually not very big).
7. I left the wall to dry for a day.
8. Since some bird shapes had to overlap in order to create the “flock” design, I had to repeat steps 3-6 over a couple of days until my design was done.
This is what my wall looked like at this point in the process. Some of the birds were stenciled already, but not all:

9. Finally, I used the small art brush to fix any leaks of paint or other minor flaws of the painted image.
You can see the finished wall below. I dare say it turned out great:)


To finalize the décor of my bedroom, I bought light blue curtains and light blue bed covers. I also have these lovely sheets with a cloud pattern that go really well with the overall sky/birds theme. My mom suggested painting one of my laundry baskets in blue, which also turned out great. You can see some of these additional decor touches in the images below:


OTHER IDEAS:
Other things that you can do:
- Paint a wall in a darker color, like dark blue, dark green, etc, and have a design in lighter color on top of it. If you match that with light furniture or a light rug on the floor, you’ll have one classy room.
- Stencil your ceiling. Imagine how cool it will be if you stencil the flock of birds on the ceiling and look at them first thing in the morning.
- If you want something funky for your children’s room, you can have them do handprints in different colors.
- If you have the money and you are not too picky about the color, you can get wall stencils. I have found some pretty awesome ones available online at the following addresses:
www.thesurfacestore.com
www.applepiedesign.be
www.miraentuinterior.com


3 comments:
Уааа! много уютно се е получило! Your home nest of peace and relaxation!
Oh, wow, I love your version better than the inspiration:) You did a great job! :)
Kosi, vij tova kato follow up na tvoia inspiration:)
http://www.flickr.com/photos/tonyadoughty/4288865183/
Dea:)
Post a Comment